When Intel introduced the NUC Element card I was skeptical, and that’s putting it mildly. I mean, who exactly was this thing for? Sure it made upgrades theoretically simpler, but it came with such a hefty price tag it seemed Intel was intentionally pricing themselves out of the market. Why by a new tech toy from Intel when you could build something just as good (or better) for less money?
Since then I can’t say I’ve changed my position all that much, but looking at Ghost Canyon and some of the variations, I have to admit there are some pretty nice gaming mini PCs that have come from it. They aren’t NUCs by any stretch of the imagination. Skull Canyon and Hades Canyon aren’t really NUCs to me either, but something as large as Ghost Canyon can’t be put into the same group as the typical 4″ X 4″ NUCs.
Despite my misgivings, I actually ended up with an i7 NUC Element last year. I won’t get into the how or why, but there it was sitting on my shelf, a full blown i7 computer on a card that just needed a case with a PCIe interface to make it work. It sat there collecting dust for months, and I’d all but forgotten about it. That was until I spoke with someone from SilverStone and learned they were working on an Element case and they wanted me to review it. There were some delays and setbacks due to parts supply issues, but eventually one showed up at my doorstep. Inside the unassuming box was SilverStone’s Vital 4 case, a complete case for the NUC Element board. Kind of a DIY Ghost Canyon option.
As I’ve mentioned recently my interest in the NUC world, and tech in general, has been on the decline for a while. I’d gotten to the point where trying out new stuff seemed kind of pointless. But when I took this case out of the box, I was intrigued. It was sleek, simple, elegant, and small (for a mini PC case, not for a NUC). I pulled it out of the box and started working with it, and the more time I spent, the more excited I got about what I was building with it.
So let’s take a look at the Vital 4 (aka the VT04) and see if it’s worth the time, money, and effort to build something around a NUC Element board.
Before we get started, I want to be clear that this IS NOT a review of the Element, or even a discussion of whether it’s practical or worth the money. I’ll leave that up to you. What I’ll be focused on is SilverStone’s case and whether it lives up to my expectations, works the way it should, and makes for a strong end product.
What’s in the Box?
Other than the case itself, you get a few accessories like the cable and bracket to allow you to connect a 2.5″ drive, extra power connectors, and extra screws.

That’s about it. Mine didn’t include any kind of instructions, but I’d imagine the production models will have at least a pamphlet explaining how to connect everything.
The Case
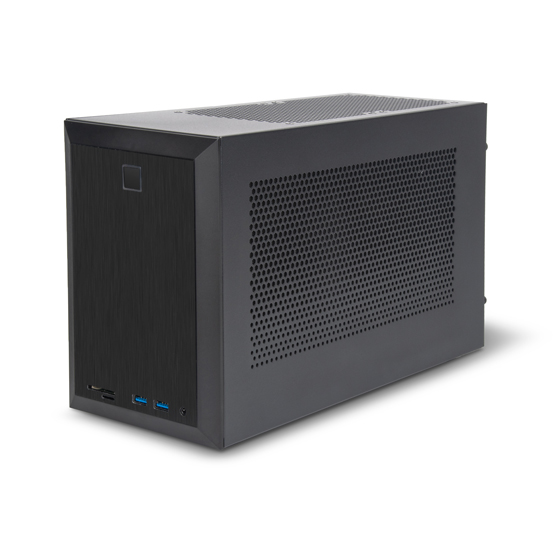
The best word I can think of to describe the VT04 is “sleek.” It’s an unassuming, clean design that blends in nicely with most setups. Not much in the way of flashing lights, buttons, switches, knobs, etc. Instead, you get a handful of ports on the front and one big power button. Personally, this is they way I prefer my computers to look. I’ve never been a huge fan of the crazy RGB stuff, or having all sorts of stuff on the front. I like my computer to disappear not stand out, and this one does that nicely.
Most of the I/O on the Element is on the back anyway, so it’s nice to have just a few ports on the front to keep the neat look.
It also feels sturdy. The case is metal and plastic, and it’s hefty. Often with cases like this you get some flex and they feel flimsy. Not here, though. It’s a strong, solid build.
Specifications
Here’s a link to SilverStone’s official specs.
For the sake of convenience, I’ve copied the highlights here:
- Support up to 321mm high-end graphics cards including RX6000 series or RTX 3000 series
- Built-in antenna for Intel® Wi-Fi 6 and Bluetooth 5.0
- Key lock design for extra security
- Dual color LED power button, allows reading of hard drive activity status
- Equipped with 2 x 120mm PWM controlled fans to effectively dissipate internal system heat
- Support 1 x 2.5″ SSD
- Front I/O includes 2 x USB 3.1 Gen 2, 1 x Audio & MIC, SD/Micro SD card reader
- Removable dust filters on left and right side
- Model No: SST-VT04B
- Material: Steel, plastic
- Motherboard: Intel® NUC 9 Extreme Compute Element
- Drive bay: External–Internal2.5″ x 1
- Cooling system: Top120mm x 2 (Default)Bottom–Internal–
- Front I/O: USB 3.1 Gen2 x 2, Audio & MIC x 1, SD card reader x 1, Micro SD card reader x 1
- Base Board: PCIe x16 for NUC, M.2 Slot x1, PCI-E x8 for VGA, PCI-E x4
- Power supply: 700W 80 PLUS Gold SFX Power (Default)
- Limitation of VGA card: Length: 321mm; Width: 168mm
- Limitation of CPU cooler: N/A (Intel® NUC 9 Extreme Compute Element built-in)
- Limitation of PSU: 100mmDimension141mm(W) x 206mm(H) x 354.3mm(D), 10 Liters
5.55″ x 8.11″ (H) x 13.95″ (D), 10 LitersExtraRF antenna x2 (Support 802.11AC & Bluetooth 5.0)
What I Added
Not that it matters for the sake of the case review, but to get this system set up used the following components:


Everything else is on-board with the NUC Element.
The Board
SilverStone says their board was designed using the specifications Intel provided, so it should be roughly the same in terms of features and performance to what you get in the Ghost Canyon case. It includes PCIe slots for the Element (x16), graphics card (x8), and a x4 slot for things like Wifi adapters. It also has an m.2 slot keyed for NVME drives.
Unfortunately I ran into a bit of a hiccup with the NVMe slot. I tried several drives in it and none were recognized. No matter what I tried, the slot showed as not populated.

After some back & forth with SilverStone, and them sending me a replacement board that showed the same results, they came to the conclusion that my NUC Element card was one of the earlier ones, which were known to have issues with the board’s NVMe slot. So I wasn’t able to test the performance of SSDs in the slot. I’m told my situation is fairly unique, and this won’t be a problem for retail NUC Elements. I was a little bummed about that because I had the idea of using two drives in the Element and one on the board to create a RAID array. But then I learned that when the board’s m.2 slot is populated, the performance of the PCIe slot is cut in half. This isn’t an issue with the SilverStone board, as it follows Intel’s specs. Apparently that’s the case on the Intel board too. So even if it had worked for me, it sounds like using it is a bad idea if you’re using a discrete graphics card.
2.5″ Drive Support
Silverstone includes a 2.5″ drive bracket that mounts to one of the card slots. They also include the cable needed to connect a 2.5″ drive to the Element board. Setting this up is as simple as installing the drive, connecting the cable, and attaching the bracket. Doesn’t get any easier than that.

Once installed it does take up one slot, but it puts the drive out of the way.

Installation
The first thing I noticed when it came to installation was there are A LOT of connections to make. All the needed cables are there, but seeing them can be a little daunting.


You’ve got power, I/O, Wifi antennae, the 2.5″ drive connection, etc. Like any build, you just take them one at a time and befor you know it, you’re done. The best solution I found was to use the diagrams of the Element board from Intel’s specs to determine where the connectors were located. Page 39 is where I found the most useful information:

The side panels are held in place by a couple of thumbscrews each, so they’re easy to remove. A great design choice is the magnetic, removable dust filters on the side panels.

Dust is an ever present issue with computers, and I like being able to pull these off, blast the dust off of them, and drop them back on without tools or screws.

Time will tell how much dust accumulates on these screens, but based on the amount of air the fans are pulling, if you’re in a dusty environment you’ll likely come to love the filters.
The front and top flip up as one piece, exposing the internals.

I love the flip top case design. It makes installing the Element and GPU so much easier than trying to angle them into a case that doesn’t open up.

With the case flipped open, the interior is easily accessible. My only recommendation to improve the design is to not require removal of the screws to flip the case open. A simple latch would seem to work just as well, and make the process quicker.

Connections
As mentioned, the bulk of the I/O on the NUC Element is on the card itself:

The front has the SD card slots, two USB 3.0 ports, and one audio port. Other than that, there’s no thing on the front but the power button.

GPUs
Kind of the whole point of this design is to support discrete graphics cards. I did say this review wasn’t about performance, but it’s important to know the feature works, so I picked up a GPU to try in the case:

Alright, go ahead and laugh. Get it out of your system. Yes it’s an old crappy graphics card. A decent enough card…back in 2017. I’ve said many times I’m not a gamer, so I’ve never had much need for a discrete GPU. On-board graphics are fine for me. To test the case I had to actually buy a GPU, and I’m not interested in dropping hundreds of dollars on a shiny new one just to see if it works. So laugh it up, but I’m the one saving enough for another computer by not getting into a GPU-waving contest.
Anyway, I dropped the graphics card in and it worked.
What else can I say? I ran a quick performance test and the GPU did as well as it would on any motherboard. In fact, the discrete GPU’s performance was roughly equivalent to the on-board graphics performance. That right there shows you how far behind Intel is in terms of graphics. This isn’t about performance, but I find it interesting that Intel’s on-board graphics from last year just barely beat a four year old Nvdia card:

Intel On-board Graphics 
Gigabyte Nvidia Graphics
The good news is, the PCIe slot works great. And the case supports GPUs up to 321mm long and 168mm tall, which should cover most current cards.
(Lack of) Fan Noise
I was happy to see that those massive fans on the top of the case are quiet, with a low pitch.

SilverStone seems to have put some thought into which fans to use, because these produce a soft hum rather than a high-pitched whine. It’s a bit like the difference between the Skull Canyon and Hades Canyon NUCs. Skull Canyon’s fan is loud and distracting, while Hades is quiet even under load. It’s the same here. Even when running tests on it, the fan’s never got to a point where I wanted to move the computer off my desk.
Pricing
Here’s where things get tricky for me. While I really do love this case, it’s suggested retail price is $379.99. And that’s on top of the cost of the Element itself, which isn’t cheap. I suppose I can’t blame SilverStone for the high cost, because it’s just a piece of an expensive platform. But almost $400 to make a complete system out of the NUC Element may be a hard pill for some to swallow. It would make me pause and rethink the whole idea. Of course, it DOES include the 700W 80 PLUS Gold SFX power supply, which should mitigate the cost a bit.
The fact that I got this and the Element for no cost means I have no qualms about using them. When combined they make a great system. But if I had to spend the money on both, I’d hesitate for sure.
Having said that, the cost of the NUC Element seems to be dropping, so there may be a day soon when it does make good financial sense to go this way.
Conclusions
I love this case. I love the design, the features, the functionality…there’s nothing about it I don’t like. Combining it with the i7 NUC Element, 32GB of RAM, and a couple of Western Digital Black SSDs gave me a fast, solid system that will come in very handy for computer editing. This is a computer that should be useful for years to come. And if Intel has anything to say about it, upgrading it in the future should be a snap. I’m still not sold on the NUC Element as a platform, but I AM sold on SilverStone’s ability to design a case that makes the platform work. They’ve once again impressed me with their attention to detail and build quality.
My only gripe would have to be the price, and that’s really only because the price of the case has to be added to the price of the Element itself. I could probably build something just as good using a standard micro ATX board for a bit less. But the Element prices seem to be coming down, so that should help. I still don’t see the NUC Element as a NUC, but that’s just me.
So if you can get past the price and the niche nature of the NUC Element, SilverStone’s VT04 case can help you to build a powerful, beautiful mini PC.

Leave a comment