
Back in 2015 Intel released the Grass Canyon NUC, model NUC5PGYH, as their first complete NUC-based system. It included on-board storage (via eMMC), RAM, and came pre-installed with Windows 10 Home. When I reviewed it, I found it a nice little entry-level system with a “good enough” Pentium processor. What I didn’t like about it was the small 32GB of storage. For a Windows system, 32GB for the OS just didn’t seem enough. Also, 2GB of RAM, while functional, didn’t leave much room for running multiple apps at once.
Intel’s new Arches Canyon, model NUC6CAYS, is the successor to the Grass Canyon. It continues the concept of an “out-of-the box” NUC system. Arches Canyon adds some nice new features. Larger storage isn’t one of them, sadly. But it does show improvements in other areas.

Side-by-side
I thought the best way to explain some of the differences between Grass Canyon and Arches Canyon was to do a side-by-side comparison. The video below walks through some of the internal and external changes, and I discuss a few of the differences you can’t see as well.
For a complete list of specs, your best bet is to head to ark.intel.com. There you can scroll through all of the NUC models, and list features side-by-side. By default, the page highlights the differences, so it’s easy to see what’s changed. You can also dig through the technical product specifications.
Some Obvious Changes
At first when I saw the darker grey finish I wasn’t sure I was a fan. But the more I look at it, the more it grows on me. It’s a more subtle finish than the bright silver, and it blends well into a home theater setup. After living with it for a while, I’d have to say I like it at least as well as the silver.
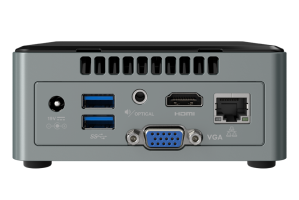
The vent holes on the sides of the unit show off a diagonal grid pattern:

That seems to be strictly cosmetic, but might help with air flow too.
Moving the power button to the front was a great idea. My two main uses for NUCs are as PC replacements and as home theater PCs. For the PC NUCs I generally mount them on the back of the monitor, or somewhere else out of sight, making the power button placement irrelevant. For the HTPCs, they’re front and center, so having the button and light on the front means I know at a glance what state the NUC is in.
No power button on top also means the lid is completely smooth. More on that later.
A Little Surprise
When I first powered on the Arches Canyon, I was expecting something similar to other NUCs, but I got a cool little surprise:
The geek in me loves little touches like that. Instead of a tiny flashing LED, I get a neat effect. Of course, as much as I love the little light show, I can see others not necessarily wanting all that flashing in their face. I’ll have to live with it as a home theater PC for a while to decide whether it was a brilliant, cool change or if it’s just too distracting. To get a different perspective, I showed it to my technology-averse wife. As usual, she didn’t beat around the bush. Her reaction? “That thing’s going to give me a seizure.”
EDIT: After playing around with the updated BIOS, I found the settings for the button LED and ring LED. You can actually control the behavior of both. Each LED let’s you determine whether it shows HDD activity or power state, and you can swap the ring color between blue and amber. It makes the ring a much cooler feature. My favorite is to use the power button LED to indicate HDD activity, and use the ring to indicate the power state. It’s a nice look and isn’t distracting at all.
My First Time with Cortana
Setting up Windows for the first time on the system was pretty much the same, except that this time I chose “Use Cortana” so I could take the built-in microphones for a test drive. There was no other setup involved. When Windows hit the desktop, I hit the microphone icon for Cortana, asked “how far is it to the moon?”, and Cortana answered immediately. I went through a series of questions, ranging from how to get to the Grand Canyon, to how to get cranberry stains out of a shirt. I tried from different distances, and even tried asking questions while I moved around. Cortana heard me and answered every time. Not a single hiccup. I’d have to say the front-facing microphones were a great idea if you’re interested in using Cortana.
Once again, I ran this feature by my wife, and again she got right to the point: “I don’t want my computer listening to everything I say.” I guess we won’t be seeing Alexa in our house any time soon.
Performance
Well…what can I say about performance? Windows performed just fine, and I didn’t notice any lag. The Celeron CPU is plenty strong for basic Windows work. It’s not an i3, but then again you’re not paying for an i3 either. You don’t get a Tesla by paying for a Honda, but if a Honda’s all you need, you’ll come out fine. If you’re browsing websites and checking email, you’ll be just fine with the quad core Celeron. I still think 2GB of RAM is on the low side, and this NUC is certain to get an upgrade if I use it for Windows. While the CPU did seem a bit faster, the difference was negligible, and nothing you’d notice during normal use.
The big issue for me, though, is the 32GB of storage. I said it with the Grass Canyon NUC, and it holds true here; you’ll be adding storage if you have a need to save anything to the NUC. 32GB is cramped right out of the box, so if you plan to save pictures, video, or even a decent amount of spreadsheets, plan on adding a 2.5″ drive. And remember, 32GB isn’t 32GB. You’re actually getting something closer to 28GB, and over 15GB 12GB will be taken up by Windows right off the bat:

CEC
Attempting to use the on-chip CEC was interesting. At first, I couldn’t find it at all. Nothing in the BIOS, no device listed in Device Manager…nothing. After a while I slapped my forehead and realized I hadn’t updated the BIOS. So I downloaded and flashed the latest BIOS, and guess what showed up in the BIOS:

That was my first hurdle. Next I attached it to my Vizio TV (the one I’d used for testing the PulseEight CEC adapters from GoRite). Unlike my experience with the PulseEight adapters, though, when I turned the NUC on, I got nothing. I went to the TV’s CEC menu and scanned for attached devices, and the NUC’s CEC did show up (with a strange name):

Unfortunately, the TV remote still didn’t control the NUC. I’d already installed Kodi (my favorite HTPC interface), and it worked with an IR remote. But nothing from the TV remote. I attempted to look at the CEC settings in Kodi and found they weren’t there. So I connected my external CEC adapter. Kodi immediately recognized it and all of the CEC features showed up.
I fiddled with it for a while longer and finally decided to reach out to a friend on the NUC team at Intel to see what was missing. He got back to me right away with the explanation: the on-board CEC was limited to what was listed in the BIOS; i.e. controlling the TV’s power. No remote navigation. This was more “CEC lite” than full CEC. Naturally I was disappointed. I’ve been a fan of CEC because it eliminated a remote control, not because it turned my TV on and off for me. He also reminded me there was an internal CEC header, so an add-on adapter was an option, and I could always go back to my external adapter.And if all else failed, I DID have a built-in IR receiver. So it wasn’t like I couldn’t have a remote control. Small consolation, but like the adult that I am, I decided not to stomp my feet and throw a tantrum.
Options
Intel does offer the NUC6CAYH, which is an identical model, just without the eMMC storage, the memory, or Windows. So if you’re like me and want more RAM and storage right away, that might be an option. But remember you’re giving up that Windows license. For my money, I’d likely take this model and upgrade to an SSD and 4GB of RAM immediately. The fact that this one has an extra memory slot means I don’t have to pull the 2GB of RAM it comes with, and can instead add 2GB.
Lids
Speaking of options, one of my favorite ways to add features to my NUCs is by using GoRite lids. I review them and talk about them a lot for a simple reason…they work. They add nice features, but keep the clutter down and keep your NUC looking sexy.

With this new power button design, existing GoRite lids won’t work. I suppose you could force one on, but it would look a little funny with a round hole on the top with nothing in it. Luckily GoRite has been working with Intel and have come up with a suitable design. In fact, they just sent me one to evaluate. That’ll be a story for another post, but I’m happy to say lids for this design are coming soon. Also, the lack of a power button on the top of the NUC means the lid is a blank canvas. I experimented with “skinning” a NUC a while back, and was pretty happy with the results. This new design means no need to cut around a power button hole.
Conclusions
As a complete Windows system, Arches Canyon does what it’s meant to do; you get an out-of-the-box system and it works pretty well for most basic tasks. The addition of the front-facing mics opens up the convenience of Cortana without requiring a separate mic, and the option for dual-channel memory means you have the potential to squeeze a little extra performance out of the system when compared with its predecessor.
Some of the cosmetic changes are especially impressive. Moving the power button and LED to the front of the system was a great choice, and adds to the NUC’s usability as a home theater system.
Arches Canyon isn’t perfect. For one thing, I was disappointed in the lack of full CEC remote support. And I’m still not crazy about the limited storage for Windows. But for what it is, and for the low price tag, this new NUC does what it came to do. As with any budget system, if you go into it understanding what you’re getting…and what you’re not…you’ll get a pretty decent entry-level system.

Leave a comment