Migrating the NUC5PGYH’s eMMC drive to an SSD

First, a disclaimer: I make no guarantees that any part of this process is going to work for you.  Try it entirely at your own risk. Consider yourself warned.

Second, if you don’t feel like reading the full story, you can skip to the needed steps.

I recently reviewed Intel’s first complete NUC system, the NUC5PGYH.  While I’ve been mostly pleased with its features and performance, I was less than thrilled with the piddling 32GB of eMMC storage it comes with.  Things took an interesting turn when I ran Windows Update. It installed a bunch of updates, but there was a large one that wouldn’t install.  This one was for Windows 10 Home, version 1511, 10586.  It was a pretty substantial upgrade. I kept getting a vague “We found some issues” message:

error1

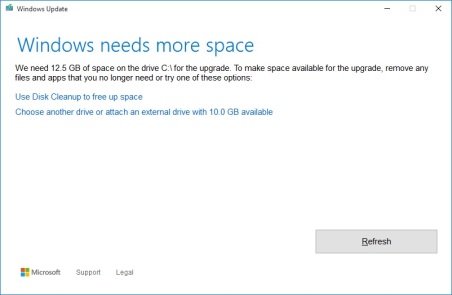
Clicking the “Fix Issues” button simply started the (very large) download again.  After several reboots and retries, I got to a different screen, where it complained about not having enough space on C:

error2

So I set about cleaning things up.  I cleaned up some downloads, some temp files, etc. I tried again. Same error…need more space.

See…I knew this 32GB eMMC just wasn’t enough for Windows.

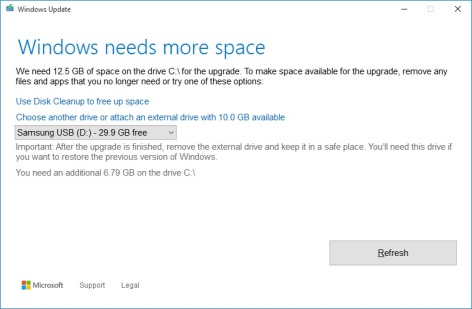
Fortunately the installer had the option to use a different drive for temporary storage. So I added a USB flash drive and pointed to it.  Things started to move again, but then another error came up saying that even though I had added storage Windows STILL needed more free space on C:

error3

Ugh…you know what, time to just clone this eMMC onto a larger drive and get on with my life.  So I attached an Intel 80GB SSD via my USB dock. I downloaded the Intel Migration Tool and told it to clone my eMMC to the SSD.  Everything went along smoothly until the system rebooted to start cloning. Then this happened:

error0

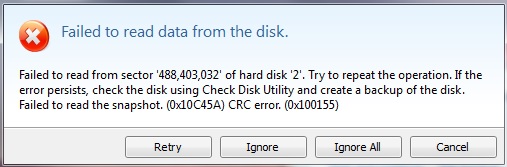
Weird…was there a problem with my SSD, I wondered?  I clicked through the errors, rebooted, and checked my SSD…all green, all good.  Maybe there was an issue with the eMMC, I thought. Checked that, but again no issues at all.  Ok, so maybe there was something wrong with the Windows files. I ran sfc/ scannow. After a while it came back and said everything was fine.

Again, weird. So I tried again. Same errors.

Aha! Now I had it; it had to be because I was using a USB dock. So I cracked open the NUC and installed the SSD directly.  Tried again. Failed again.

This was getting irritating: I was using Intel software on an Intel NUC to migrate an Intel eMMC to an Intel SSD. And so far this thing was treating me like an ex that you run into at the grocery store.  Ok, technically the software was Acronis, but still. You’d think things would go a LITTLE smoother. To quote the immortal Harrison Ford; “How can IT not know what IT IS.”

I poked around the internet looking for clues, but found nothing definitive. So I decided to try a different cloning method.  Ordinarily I’d just pop out the offending drive and put it in my dual dock and clone it that way, but the eMMC is soldered down so that’s a no go.

I started researching free cloning utilities.  I tried several, but found that most had similar errors, or completed the clone but the drive wouldn’t boot, or wanted me to pay for the full version to complete the clone.  I wasn’t planning on doing this again, so I didn’t see the need to drop $20-$50 on a tool I was only going to use once.

So the clone worked great (yay!) but the tool wouldn’t allow me to resize the partitions (not yay).  The layout of the eMMC was such that it had a recovery partition as the last partition on the drive, so Reflect didn’t have an option for making the regular Windows partition larger (presumably because of this recovery partition being in the way).  I went ahead with the clone, and ended up with a fully bootable SSD with the same dinky 32GB of space.  Great, so now what?

I got a little creative; I used Reflect to make a backup image of the eMMC. Then I used Windows’ built-in Disk Management to delete the recovery partition on the SSD, then resize the Windows partition to use most (but not all)of the disk . Finally, I used Reflect to restore the recovery partition from the backup image onto the SSD.

Well, it all worked. I was then able to run Windows Update and get the updated version downloaded.  It was a bit more work than I’d planned on, but in the end I got there.  I now have a fully functioning and up to date unit.

I’ve considered trying to clean things up enough that I could copy the updated Windows back to the eMMC just to see if it would fit, but for now I’m fine with it as is.

Hopefully this will help some other folks who may run into the same issues with their tiny eMMC.


Posted

in

,

by

Tags:

Comments

36 responses to “Migrating the NUC5PGYH’s eMMC drive to an SSD”

  1. Yvan L.C. Avatar

    Very usefull. I was becoming really mad with the problems of clone faillure -_- Fucking solded hardware :p

    Like

    1. Techster Avatar

      The on-board nature of the eMMC adds a layer of complexity to cloning. I’m used to popping a drive out and cloning it. I get why they used an eMMC, but it makes things harder. Having a removable mSATA drive would have upped the cost but lowered the frustration.

      Like

  2. Marc Avatar
    Marc

    Thanks Techster, great work. It’s hard to find info on this subject, I guess due to the difficult of cloning a non-removable drive. I have the same issue, so I’m contemplating migration of the OS from the eMMC to an SSD, even though MS put out a fix (KB3124260) and I’m installing the 1511 update right now. I’ve got a Samsung 850EVO at 250 GB ready to install, just waiting for Intel to ship me the missing proprietary Sata/Power cable. I’ve always had good luck with Samsung Magician software, would you know if that works? If not, no problem using Macrium I guess, it’s free after all. Was wondering why you were unable to resize your SSD partition to use the full size available, did you do that purposely to leave room for a recovery partition?

    Like

  3. Techster Avatar

    Hi Marc, thanks for replying, and thanks for the kind words! The cloning didn’t allow me to resize the partition, so I ended up doing that after the fact. What I had to do was move the partitions around first. Since the free space on the SSD was after the recovery partition, I had to move the recovery partition to the end of the drive. Once I did that, I was able to extend the C partition and use the whole drive.

    Ultimately I decided to install Libreelec on the eMMC and use it as a home theater PC, but I kept Windows on the SSD in case I decide to go back to it. So far I haven’t found a need to.

    I’ve never tried the Samsung software (haven’t bought a Samsung drive) but my guess is you’ll have better luck with it than I did with the free options. Usually the software that comes with a new SSD is set up to automatically resize the partitions to fill the drive…at least that’s been my experience so far.

    Let me know how things go for you, and let me know if I can help!

    Like

    1. Marc Avatar
      Marc

      Thanks Techster, I’ll give Samsung Magician software a try and let you know how it turns out. I just happened to check out your HTPC blog and video last night, another great, informative article! That KODI is a beautiful interface. It turned on instantly, moved between Movies, TV, Recording so quickly! So now rethinking my own HTPC situation, this is why I bought the Intel NUC anyway. Like you said, it is perfect for an HTPC, and I totally agree! I have 2 other HTPC’s; I could literally fit 4 of these NUC’s inside one of them! I will start looking into Libreelec, KODI, CEC, etc. and need to review your post (was getting late last night when I found it). That was a nice setup!

      Like

      1. Techster Avatar

        Well I’m glad you enjoyed it! I do love Kodi. I’ve tried other HTPC interfaces but I always come back to Kodi. Even back in the day when Windows Media Center was around I preferred XBMC (what became Kodi) over it for its flexibility and add ons. And CEC really is awesome. My living room TV doesn’t have CEC capability, so whenever my wife uses the NUC in the living room she’s a little bummed that she has to have the extra remote. The other NUC with CEC has spoiled her!

        Like

  4. Andy Avatar
    Andy

    I’m a bit late to the party here, but in case anybody else finds this thread, I figured out how to resize the O/S partition during the clone process using Macrium Reflect (free version).

    When you are dragging the partitions from the source drive layout to the target drive layout, stop after you’ve done the O/S partition. Then click on that O/S partition on the target drive layout and select the blue text “Cloned Partition Properties” below the target disk layout to get the resizing options. Then you can select the option to make the partition the maximum size followed by setting the Free Space option to 1GB to allow space for the last partition.

    Once the O/S partition is resized to use all but 1GB of the available disk space, you can drag the last partition into the 1GB of empty space you left when resizing.

    Then just start the clone process. The three support partitions will be their original sizes and the O/S volume will use all of the rest of the disk space once the clone process completes.

    Like

  5. Daniel Avatar
    Daniel

    I tried to do the same thing before landing on this page. I cloned my whole 64 gig eMMC onto a brand-new 250 Gb SSD using Macrium, which is indeed a great product. The eMMC has three partitions: a 100 Mb EFI, a 450 Mb Recovery partition, and sandwiched in between them the system (C: NTFS) partition. Macrium cloned all three of them onto the SSD, leaving a ~ 170 Gb non allocated area on the SSD. However, looking at the info with Disk Manager I noticed that while the eMMC system partition is marked as “Boot, Page File, Crash Dump, Wim Boot, Primary Partition”, the corresponding copy on the SSD only shows “Wim Boot, Primary Partition”.

    I rebooted, and effectively, I had to set my BIOS to legacy to be able to see the SSD. And booting from it failed.

    So, I understand from your post that when you cloned the system partition Macrium Reflect got you a bootable copy?

    Like

    1. Techster Avatar

      Hi Daniel. I didn’t run into this issue. When I was done cloning and resizing, I ended up with the same set of partitions and was able to boot from the SSD in UEFI mode. One thing you could try is cloning the partitions individually (in the order they show up on the eMMC), rather than the whole drive.

      Like

      1. Daniel Avatar
        Daniel

        It worked! I removed all the partitions from the SSD (removing the EFI one was quite a challenge) and did the Macrium thing again, partition by partition, although I don’t think that was the reason for the initial failure. RED HEARRING: The different attributes that Disk Management was showing between the original system partition and the clone one was a read hearring: upon rebooting with the SSD now it is the eMMC that only shows “Wim Boot, Primary Partition”. Thanks a lot for this blog!

        Like

  6. Daniel Avatar
    Daniel

    of course, I meant “red herring”.

    Like

    1. Techster Avatar

      Awesome, glad it worked! I got that you meant red herring, although “red hearing” does sound like a great name for a sci-fi story.

      Like

  7. Torben Avatar
    Torben

    Just for info. Windows put alot of update files, log files, temp files etc on the hard disk. And doesn’t clean up after use, so these files just use alot of the disk space. If you have space trouble, you can always try to use the search windows feauture. Search for clean. A program called Disk cleanup will show. Right click it, and chose to run as administrator. Very important to do that, because now it will also look for update files etc. Chose C drive, and scan. It will run for a while, and a list pops up showing temporary internet files etc. And alot of data without checkmarks. Have experienced that you can clean many gb’s of data this way, by marking windows update, error logs and other files. Choose the data to clean, and start cleaning. After the window disappear, restart the computer. Now with a little luck there should be space enough to run your update and such. Might be faster than cloning or upgrading the SSD.

    Like

    1. Techster Avatar

      Believe me, I tried. I used every tool and trick I could think of to clear up space, but to no avail. In the end, cloning was just the easier option. Plus I wanted to get off the eMMC.

      Like

  8. snoopsheep Avatar

    Great solution, thanks!

    Once I’m up and running and booting safely from the SSD, should I wipe the eMMC, leave it with windows installed, or do whatever I want with it? Any pros/cons/risks to be aware of?

    Thanks again for the guide, really useful.

    Like

    1. Techster Avatar

      I can tell you what I did: I left Windows on it, convinced I would eventually need it. A while later, I took Windows off of it completely (off the SSD AND the eMMC) and installed Libreelec. I haven’t looked back. I’m not going to tell you to wipe it out and reuse it, but I don’t see any reason you couldn’t. The Windows license is tied to the system, not the storage, so even if you pulled the SSD, wiped the eMMC, and reinstalled Windows from scratch, you should still be able to reactivate it.

      Like

  9. Andy Avatar
    Andy

    I left the original copy of Windows on the eMMC, but simply disabled the eMMC in the BIOS (under Advanced / Devices and Peripherals / Onboard Devices. That way it’s always there as a protected copy of the factory O/S in case your SSD dies or becomes corrupted. You can simply enable the eMMC and repeat the migration to get back to a working O/S without starting from scratch.

    Like

    1. Techster Avatar

      That was my original plan as well. But I decided to drop Windows and go with a Linux-based solution. I’m not terribly worried about getting Windows back on it. But your suggestion is solid for the average user. The other thing to consider is just what you’re going to get out of the eMMC if you wipe it. Let’s face it, eMMC isn’t lightning fast. And at 32GB, it’s not giving you a huge amount of space. So in the end it might be better to just leave Windows on it and turn it off.

      Like

      1. taconsolacion Avatar
        taconsolacion

        Thanks for sharing all your hard work. I also ran into the Windows update issues owing to the minuscule 32GB EMMC where the system files reside. Your approach is too much trouble. In the end I simply turned off the EMMC and Windows in it like you said, and am now running Ubuntu Mate happily on a 500GB 2.5GB hard disk. Sometimes Windows becomes a victim of the physical limitations that are of its own making. Great post anyway, appreciate the learnings!

        Like

  10. Dan Pena Avatar
    Dan Pena

    Thank for the information and advice, everyone. I have a AMD Quad-Core E2-7110 and it’s a great and inexpensive laptop but, the 32GB drive w/operating system is a bit of a hindrance. I have decided to install a 120GB SSD and make it a lot more usable. Your comments and directions should help me get through this effort successfully. Once I install the drive and have the system recognize the SSD, I might have a repair store migrate the OS to the SSD but, your comments and directions might get me through the task. Novice Dan says THANKS!

    Like

  11. DannyG10 (Dan Pena) Avatar
    DannyG10 (Dan Pena)

    I installed the SSD and finally I was finally successful (installation was easy, software was tricky). I used MiniTool Partisan Wizard and it seemed to work for a few restarts then about the 3rd attempt, it was not booting. I formatted the SSD and retried with Macrium. That worked. I disabled the eMMC drive through the Computer Management / Device Manager because I was not able to access that option in the BIOS. With the help of this Blog and a few YouTube Videos, I was able to do this upgrade to my HP Laptop. Thank you all for posting. I really like this HP Laptop 14 Amd E2-7110 Quadcore and this installed drive will make it much more useful.

    Like

  12. teddy Avatar
    teddy

    I tried to clone the system to a USB hard drive of 320 gb but it won’t start.

    Like

    1. Techster Avatar

      Hi Teddy,

      How did you try to clone it? What utility did you use?

      Thanks.

      Like

      1. teddy Avatar
        teddy

        I have tried both Todo and Macrium with no success. I was able to select the usb drive as the boot device but it just won’t start.

        Like

  13. Phil Avatar
    Phil

    Thanks for this article. Managed to successfully migrate OS from the eMMC of my NUC to a new SSD using Macrium Reflect (free).

    Used the same techniques here, partitioned my 1TB SSD into 150GB (sysvol) and 850GB (data) made an image of the eMMC saved to the 850GB partition. Then restored that into the 150GB, resizing the Windows partition from the 32GB to 149GB, leaving 1GB for the recovery volume.

    Rebooted, disabled the eMMC in the NUC BIOS and ca-ching.

    Cheers all.

    Like

  14. bencro Avatar
    bencro

    Can the eMMC be cloned to the SSD that is installed in the NUC, or must it be done with an external cable of some sore?

    Like

  15. Aldin Avatar
    Aldin

    So a quick question: Using Macrium, formatted SSD, done with cloning, exact same as eMMC on the SSD, go to BIOS change the boot sequence to boot from the new SSD F10 and reboot, but eMMC still shows as C: drive and the SSD is still D: drive? How did you disable the eMMC in the bios? I got no setting to disable the eMMC? I put it all the way down the boot menu. Any ideas would be much appreciated! This is a dumb Acer computer btw…

    Like

    1. Techster Avatar

      The NUC has a BIOS option to disable the eMMC, so it’s pretty easy. If you don’t have a disable option, I would think setting the boot order would be enough. Are you able to go to a boot menu when it’s starting up and select the SSD to boot from?

      Like

      1. Aldin Avatar
        Aldin

        Hi Techster – thanks for replying so quick. Yea, I don’t have the disable option in the BIOS. I set the boot order for the new SSD to be first, move the eMMC down the list, save and reboot, but SSD is still drive D: and the eMMC is still drive C: and Windows still runs on the eMMC. When swapping out other laptops all I had to do is take out the HDD and plug in the SSD and that takes over automatically then I just wipe the HDD clean and use it as an extra storage. I am wondering how safe is it to pop in the recovery USB stick, partition the eMMC clean, reboot with the SSD still attached, would the SSD then take over as the eMMC would be blank? Any thoughts? Thanks again!

        Like

      2. Techster Avatar

        That’s the way it should work, but then it should also let you boot from the SSD and use the eMMC as a D drive. Have you tried forcing it to boot to the SSD (via the boot menu)? I’d be interested to see what it does when you tell it to use the SSD (i.e. whether it lets you boot to it, and whether it sees it as the C drive). Let me know!

        Like

  16. A123321 Avatar
    A123321

    Thanks for the really helpful guide. In case this helps anyone, I had the same issue that I couldn’t set the new SSD as the boot drive instead of the eMMC (on an acer) after cloning with macrium reflect free. I could boot from it temporarily by pressing F12 but couldn’t disable the eMMC to stop it from booting next time. I solved it by using a Macrium boot disk and selecting Fix Boot Issues, then could select which drive to boot. Cheers.

    Like

  17. Santo Peccatore Avatar
    Santo Peccatore

    Hello Techster… Just want to thank you for you useful hints. i just finished migrating from eMMc 32gb to SSD 240 .. after the cloning with Macrium Reflect, just like you i had only 32gb on my ssd. Then i used the Windows Disk Management to simply extend the volume to include the remaining 195gb without having to delete the recovery partition, though before this i had to backup the original eMMc 32gb on an external disk for safety. thanks a million.

    Like

    1. Techster Avatar

      Glad it worked for you! It’s been a while since I had to do this, so there are probably faster/easier ways now. But I’m glad it was useful.

      Like

  18. BestOtis Avatar

    I see you don’t monetize techsterweb.com, don’t waste
    your traffic, you can earn extra cash every month with new monetization method.
    This is the best adsense alternative for any type of website (they approve all sites), for more
    details simply search in gooogle: murgrabia’s tools

    Like

  19. badelhas Avatar

    This is a great tutorial, thanks! I just bought more 4gb of ram and a 120gb SSD because the NUC is a bit slow for my taste with the 32GB eMMc and only 2gb of ram.
    I’m going to try and do what you did tonight, based on your tips! I’ll post my results later.
    Cheers!

    Like

    1. Techster Avatar

      Awesome, I posted this quite a while ago so I hope the process is the same.

      Like

Leave a comment